Guide
Drip acclimation: how to drip acclimate fish
A step-by-step guide to drip acclimation - the gentlest way to add new fish when temperature and water chemistry differ from your tank.
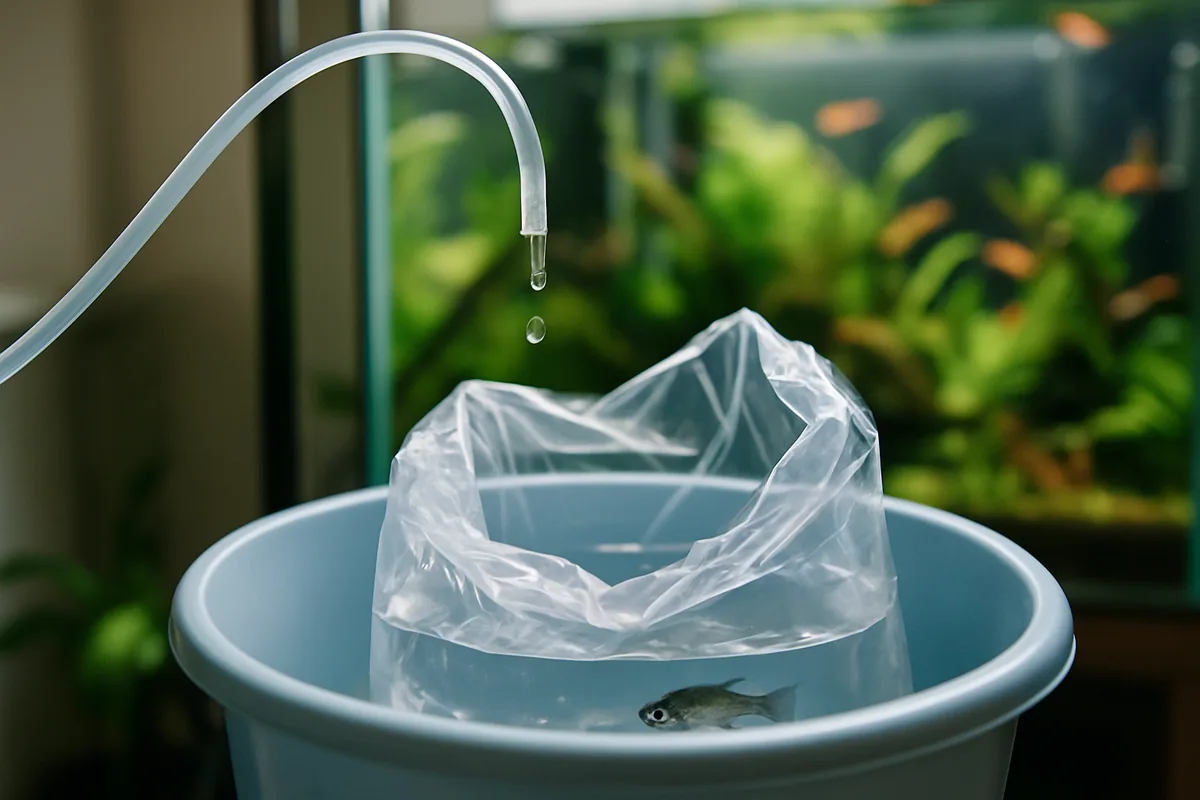
- What it is: A length of airline tubing siphons tank water into a bucket at a controlled drip, slowly equalising temperature, pH, and hardness around your new fish.
- Drip rate: 2-4 drips per second. Too fast defeats the purpose; too slow and fish sit in ammonia-laden bag water.
- Time: 30-60 minutes for most fish; 60-90 minutes for shrimp, wild-caught specimens, or discus.
- When to use it: Sensitive species, large parameter gaps between source and your tank, long transit, or expensive/rare fish you can't afford to lose.
- When the float method is fine: Hardy community fish (guppies, danios, platies) from a local store with similar water chemistry.
- Critical rule: Net the fish into the tank - never pour the bucket water in. It carries pathogens and ammonia.
What drip acclimation actually does
Fish can handle a range of temperatures and water chemistry - but they need time to adjust. The stress isn't the destination parameters; it's the speed of change. When you move a fish from a pH 6.8 bag into a pH 7.6 tank all at once, the sudden osmotic shift stresses the gills and immune system even if both values are technically within the fish's tolerance range.
Drip acclimation solves this by replacing bag water with tank water so slowly that the fish barely notices the transition. By the time you net it into the tank, the water around it is already close to tank conditions. There's no shock, no gasping at the surface, no hiding for three days.
Temperature is only part of the equation. Most beginners float the bag and think they're done. What the float step doesn't address is pH, general hardness (GH), and carbonate hardness (KH) - the parameters that actually cause osmotic stress. Drip acclimation handles all of them simultaneously. You can read more about what these values mean in the aquarium water parameters guide.
When to drip acclimate - and when you don't need to
Drip acclimation is the right call in these situations:
- Sensitive species: Discus, cardinal tetras (Paracheirodon axelrodi), altum angelfish, apistogrammas, and most wild-caught fish. Shrimp and invertebrates are particularly vulnerable - their physiology responds poorly to rapid parameter swings.
- Big parameter differences: If you've tested the store's water and found a pH difference of 0.5 or more, or a significant GH gap, go slow. Even a half-point pH change represents a nearly fourfold shift in hydrogen ion concentration.
- Long transit: Fish boxed for several hours accumulate ammonia in their bag water. Lower pH in the bag actually keeps ammonia in its less-toxic ionised form (NH₄⁺). As you raise pH during acclimation, some of that converts to toxic free ammonia (NH₃). Dripping slowly gives the fish time to process what's there rather than hitting them with a sudden spike.
- Expensive or rare fish: The 20 minutes you save skipping proper acclimation isn't worth it when you're introducing a £60 fish.
For genuinely hardy species - common platies, zebra danios (Danio rerio), mollies, or most livebearers picked up from a local store whose water you've tested and know is similar to yours - floating the bag and adding small cups of tank water every 10 minutes is sufficient. Drip acclimation is the gold standard, not a requirement for every single fish purchase.
The hobby debates drip vs float constantly, and some experienced fishkeepers drip everything out of habit. That's fine. But if you've got healthy, stable tank water and you're adding a batch of farmed guppies from a store around the corner, a careful float acclimation does the job. Save the 90-minute drip session for fish that actually warrant it.
What you need
You don't need specialised kit. Most of this is already in your fishkeeping supplies:
- A clean bucket: Dedicated to aquarium use only. Even trace soap or cleaning product residue is lethal to fish. A 5-10 litre bucket works well.
- Airline tubing: Standard 3-4 mm internal diameter aquarium airline. About a metre is enough for most setups.
- A way to control the drip rate: Tie a simple loose knot in the tubing and adjust it by tightening or loosening. Or buy a cheap plastic drip valve (aquarium shops sell them for under £2). A gang valve from a multi-outlet air distributor also works.
- A small clip or weight: To keep the tubing secured to the tank rim so it doesn't pull out mid-drip.
- A net: To transfer fish without pouring bucket water into your tank.
- Optional - a small heater or heat mat: For very long drip sessions in a cold room, a small submersible heater in the bucket keeps temperature stable.
If you're drip acclimating shrimp, use a smaller container - a large jug or even a plastic food container - so you can see them easily and they don't have too much space to hide when it's time to net them out.
Step-by-step: how to drip acclimate fish
Step 1 - Float the sealed bag (15-20 minutes)
Place the sealed, unopened bag on the water surface. This equalises temperature before anything else. Turn the tank light off - the last thing stressed fish need is bright light. Don't open the bag yet. Don't add tank water yet. Just let it float.
Step 2 - Pour fish and bag water into the bucket
Open the bag and pour everything - fish and all the bag water - into your clean bucket. Place the bucket on the floor below the tank. The height difference is what drives the siphon. If the bag water volume is very small (less than 500 ml), add a cup of tank water now so the fish have enough water to swim in without being cramped.
Step 3 - Set up the siphon
Take your airline tubing, submerge one end in the tank, and suck the other end briefly to start the siphon. Once water is flowing, pinch or knot the tubing to slow it to 2-4 drips per second. Secure the tank end so it stays submerged and won't fall out. Direct the dripping end into the bucket.
Setting the drip too fast. If water is trickling rather than dripping, you're adding tank water too quickly and losing the gradual transition that makes the whole method worthwhile. Count the drips. Two to four per second is the target.
Step 4 - Wait
30-60 minutes for most fish. 60-90 minutes for shrimp, wild-caught specimens, discus, or any fish that's been in transit for more than four hours. Let the bucket fill. The goal is to at least double the volume of water around the fish - ideally triple it. By that point the chemistry in the bucket closely mirrors your tank.
Keep the room reasonably warm and dim. Don't tap the bucket or disturb the fish during this time.
Step 5 - Discard half the bucket water, then let it refill (optional but recommended for sensitive species)
For shrimp or fish from very different water (e.g. wild-caught soft-water fish going into a moderately hard tank), pour off roughly half the bucket water after 30 minutes and let the drip continue for another 30 minutes. This extends the gradual shift further without flooding the room.
Step 6 - Net the fish into the tank
Use a net to catch the fish and transfer them directly to the tank. Do not pour the bucket water into your tank. That water contains whatever was in the bag - potential pathogens, bacteria from the store's system, and elevated ammonia. It's not worth the disease risk.
Netting shrimp is fiddly and damages them easily if you're heavy-handed. For shrimp, use a fine mesh net or carefully decant them with a small container, discarding the water separately.
Step 7 - Monitor the first 24 hours
New fish often hide for a day or two - that's normal. Watch for laboured breathing, clamped fins, or surface gasping, which can indicate acclimation stress or poor water quality. This is a good time to run a water test. If your tank is still cycling, read the guide on cycling a fish tank before adding any new fish at all.
The ammonia problem most guides skip
Here's something that gets glossed over: bag water chemistry shifts during acclimation in a way that can actually work against you if you're not careful.
Fish produce ammonia constantly. In the sealed bag, CO₂ builds up, which lowers pH. At low pH, ammonia exists mostly as ammonium (NH₄⁺), which is relatively harmless. As you drip in higher-pH tank water, the pH in the bucket rises - and some of that ammonium converts to free ammonia (NH₃), which is toxic even in small concentrations.
This is why the drip rate matters, and why you don't want to rush. A slow, steady drip gives the fish's body time to process ammonia rather than hitting a sudden spike. It's also why you should discard as much of the original bag water as possible before the fish go into the tank.
If fish have been in transit for more than six hours, consider doing a brief water-only test of the bag water with an ammonia test kit. High readings (above 0.5 ppm) mean you should drip even more slowly and perhaps extend the session.
Free ammonia above 0.5 ppm causes gill damage. Bag water from long transits can exceed this, especially once pH rises during acclimation.
Drip acclimating shrimp and invertebrates
Shrimp - especially neocaridina and caridina species - are considerably more sensitive to parameter shifts than most fish. Their permeable exoskeleton means osmotic stress hits them faster and harder. A caridina shrimp like a crystal red (Caridina cantonensis) that's used to pH 6.2-6.8 and very soft water (GH 4-6) will struggle in a tap-water tank without a long, careful acclimation.
For shrimp, run a 60-90 minute drip at 1-2 drips per second, and do the mid-point discard described in Step 5. Don't rush. A shrimp that dies 48 hours after introduction almost always died from acclimation stress, not a disease - and it's usually because someone did a 20-minute float and tipped them in.
Common mistakes
- Dripping too fast. If it looks like a trickle rather than isolated drops, slow it down.
- Skipping the temperature float. Drip acclimation addresses chemistry, but if the bag is 18°C and your tank is 26°C, you're still shocking the fish thermally. Float first, always.
- Pouring the bucket into the tank. Every experienced fishkeeper has done this at least once. Don't. Net the fish, discard the rest.
- Leaving the light on. Bright light adds stress to an already stressful situation. Turn it off for the duration.
- Drip acclimating into an uncycled tank. No acclimation method compensates for ammonia in the tank itself. Make sure your tank is fully cycled before adding fish. See the nitrogen cycle explained if you're unsure.
- Ignoring the source water. If you don't know the store's parameters, you're guessing. Ask for them, or test the bag water before you start. Some stores are happy to tell you; others won't know.
App-aquatic lets you log your tank's current parameters before a new fish arrives so you have the numbers ready to compare against the store's water. Knowing the gap in advance tells you whether a 30-minute or 90-minute drip is appropriate.
After acclimation: what to expect
Most fish hide for 24-72 hours after introduction. This is behavioural, not a sign of illness. Give them cover - plants, caves, driftwood - and resist the urge to move things around looking for them.
Feed lightly for the first day or two. New fish often won't eat immediately, and uneaten food contributes to ammonia that could stress them further. Keep up with your regular water change schedule - stable parameters matter more in the days after adding fish than at almost any other time.
If you're adding multiple new fish and want to check your tank can handle the bioload, the free stocking calculator is worth a quick check before you buy.
Track your parameters and get care reminders with App-aquatic.
Get the free appCan I drip acclimate fish directly in the bag instead of a bucket?
No. The bag is too small to hold enough additional water volume, and you can't control the drip rate reliably into a floating bag. Always transfer to a clean bucket first.
How many drips per second should the drip rate be?
2-4 drips per second is the standard recommendation. For very sensitive species like caridina shrimp or wild-caught fish, lean toward 1-2 drips per second and extend the session to 90 minutes.
Is drip acclimation necessary for fish from the same water type?
Not strictly. If you're buying hardy fish from a local store whose water is comparable to yours, a careful 30-minute float with gradual water addition works fine. Drip acclimation is most valuable when there's a meaningful parameter gap or you're dealing with sensitive species such as discus, cardinal tetras, wild-caught fish or shrimp. If you're unsure, test the shop's water - a pH difference of 0.5 or more is a good reason to drip.
How to acclimate new fish · Quarantine new fish · Temperature match water · Fish stress · Community tank fish · All guides